
Don’t Squat The Deadlift & Other Tips To Make Your Deadlift Better
Post published: Jan 5, 2019
Post updated: Feb 8, 2020
If you don’t deadlift, you should. Especially if you have a bad back, want to be seriously strong, or want to lose weight.
In regards to having a bad back, it’s likely your back is “bad” because you have a weak core or trunk extensors (lower back muscles). By doing the deadlift correctly you will help strengthen these muscles and your lower back problems should improve substantially – or completely disappear. I say correctly because most people don’t do the deadlift properly, and if the deadlift isn’t done correctly it might not help with your back and might even make things worse. I highly suggest anyone get some In-Person instruction on how to do it properly before they do it – no amount of “internet research” trumps In-person instruction.
In terms of weight loss, this is a great exercise to include in your workouts. Reason being, when weight loss is your goal you want to focus on exercises that will give you the most “bang for you buck.” You get this from compound movements, like the Deadlift. Compound movements impose the largest energy demand as they will target the bigger muscle groups and therefore a larger energy demand. More energy used = more calories burned, 12 reps of deadlifts > 12 reps of bicep curls…
There are a few different variations of the Deadlift. I’m not going to describe them in detail, rather I’ll list some of the variations below:
- Sumo Deadlift
- Trap Bar / Hex Bar Deadlift
- Snatch Grip Deadlift
- Romanian Deadlift, also know as the Stiff/Straight Leg Deadlift
- Conventional Deadlift
Here are the main things you should be thinking about when doing a deadlift, that will hold true for most of the variations listed above.
let’s first look at feet placement and grip.
- Feet placement: Depending on the deadlift variation, your feet placement will typically be shoulder width apart. More advanced lifters will offset their foot placement to account for subtle leg length differences, but I won’t over complicate things here. Just think feet under hips and shoulders.
- Grip: For most deadlift variations you will grip the bar just outside of your legs (to left and right of your knees). You can use an overhand grip (both palms facing inwards), or reverse grip (one hand with palm facing inwards, the other with the palm facing away from your body). The reverse grip makes it easier to hold the bar when your grip strength is weak. My recommendation is to mix up your grips, use the overhand and alternating reverse grip hand positions. I like to use the overhand grip for as long as I can, to work on my grip strength, then I use the reverse grip when my when grip strength is fatigued – and when doing my heavier lifts. You can also use straps to help, but my recommendation is to mix it up and not rely on solely using straps. Read this for more insight on when to use, and when not to use, straps.
Now let’s go over the movement itself.
- Horizontal movement of the Hips: the deadlift is a horizontal movement of the hips – not vertical displacement. Don’t “Squat The Deadlift,” focus on horizontal movement of the hips. Biomechanically if your knees move forward (as in torwards your toes) your hips are lowering, so this is a good indicator that your hips are moving vertically. If you perform the movement properly bar clearance of your shins and knee won’t be a problem. Here is a good visual and explanation using the trap bar. One exception to the above is for tall people, they will have to lower there hips in order to maintain a neutral lower back – they have to make an adjustment by “tucking” there pelvis under themselves and raising their chest at the bottom.
- Shoulders above hip position: always pull with your shoulders having the same, or higher, vertical position than your hips. If you have long legs like me, this will not be the case in the initial set up when you go to grab the bar. Therefore, you need to torque the bar and pull your hips underneath you. This will lead to a higher chest position and maintenance of a neutral spine.
- Lock out the upper body: this isn’t an upper body exercise. You aren’t rowing the weight, so let your lower body do the work. Retract your shoulder blades slightly and lock out your lats by “squeezing” your armpits. This will keep the upper body rigid and allow you to let the lower body do the work.
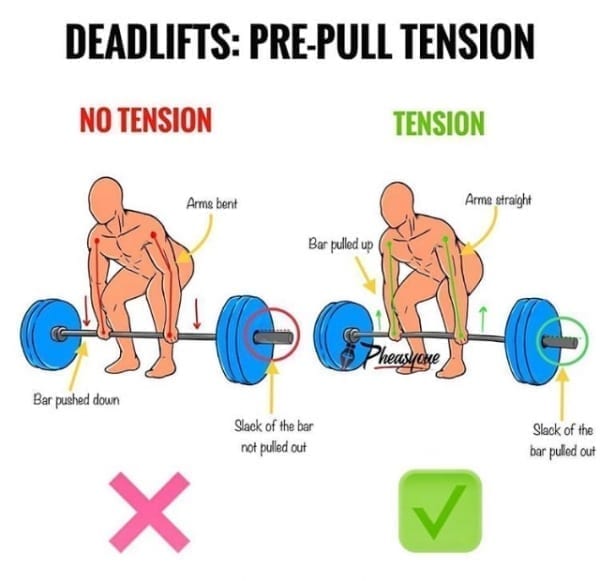
- “Take the slack out of the bar” / Transfer the weight: pull the bar upwards slightly, which is often referred to as taking the slack out of the bar. This just means, pull upwards on the bar without the intention of lifting the weight yet (see picture below). This will straighten your arm and transfer the “pull” feeling to your hamstrings. When you are ready, get your hips “under” you (hips lower than shoulders) and initiate the lift from here.
- Stay “Erect”: a good visual, courtesy of Mark Fisher, I often tell people to help them have a proper trunk (upper body) position to help maintain a neutral lower back position is: pretend your upper body is an erect boner. Yes, you read that right. You want to elongate your spine and “push” the crown of your head and hips away from each other forming a nice long, well…boner. Not a rounded back, or otherwise known as a sad boner. Or just think of flat back, whatever works for you. You can change how “flat” your back is by movement at your hips (you get movement here ranging from pelvis tucked under your rib cage, to porn star butt movement) and your t-spine (you get movement here ranging from open proud chest like a silverback gorilla, to rounded shoulder hunched over really unconfident overworked office worker movement). Play around with these two joint positions to get your nice “erect” / flat back position throughout the lift.
- Brace with breath: take in a diaphragmatic breath (this will create IAP – Intra abdominal pressure) to brace your core before you start pulling the weight off the ground. This will help protect your back and allow you to pull significantly higher numbers.
- Push away and through the floor: this has been one of the more useful cues for me when I really started looking to increase my deadlift weights. When you start the lift drive through your feet and “push” into the floor as you lift, while simultaneously pulling the bar up and away. Doing so will help you lift the weight better, and prevent you from overusing your arms and core to lift the weight – the latter protecting your lower back.
Some other things to think of:
- One Path Plane: the bar path is going to be in the same plane – it won’t move outwards, or inwards as you pull it upwards. Shoot your hips back to get clearance over your knees. See this video that goes over this point, as well as the next one, well.
- Keep it close: keep the bar as close to your body as possible, this is especially important when lifting heavy to bring your center of mass closer to your body. The closer it is to your body, the more you can centralize the stress force through your hips and not your lower back. This will help you maintain a neutral spine position, which will prevent you from injuring yourself. A good visual cue is to think of the bar always being is the same plane as your armpits / clavicle.
- No-knocking knees: Make sure your knees are tracking over your 2 and 3 toe. Avoid knee knock / valgus knee. You might not notice your knees moving inwards until you start adding some serious weight. If you do notice your knees going inward, fire up those glutes by twisting your feet into the floor. The visual I sometimes tell my clients is to pretend your foot is a screw and you’re going to screw it into the floor as you lift; your foot won’t actually move, you’re just applying outward pressure into the ground as you lift. I really recommend you video tape your lifts sometimes because I was doing this on heavy lifts without really noticing it until I started to regularly video tape my heavier lifts.
- Butt Squeeze: when the bar clears your knees, really focus on driving your hips forward and squeeze those glutes nice and tight and stand up tall at the end of the lift locking out your hips.
That should cover a lot of the basics, and more. If you are still struggling, use these two drills to help learn the movement better:
- Butt to the wall. Not to the windows…I hope some of you get that. Anyways, stand one foot length (your foot length) away from a wall. Place your weight (whatever you are using) in your normal set up – should be close and tight. Now when you go and pick up the weight drive your butt into the wall to initiate the movement. Don’t let your knees come forward much, you should have fairly vertical shins. See this video to see what I mean.
- Banded thrusts – while lifting weight, or by itself. Place a band around your hips at hip height, and attach it to a vertical point (like on a rack) at the same height. Stand far enough away so that there is tension on the band. Now, as you complete the movement drive through your hips and increase the tension on the band. This will help you “force” the movement pattern a little bit. Watch this video to see what I mean.
 Author Bio: Michael Fouts
Mike blogs on this website – michaelfouts.com – obviously, but also owns a Mobile and Online Personal Training Company called OverHaul Fitness. Mike loves helping people manipulate their body composition; losing weight while retaining muscle, or putting muscle on while minimize fat gain. Mike’s spare time is spent being active (hockey, squash, triathlons), eating sandwiches or beef jerky, or watching thought provoking movies or tv series (like Westworld). Connect with Mike via email: Mike@overhaulfitness.ca, or Social Media – links below:
If you’d like to work with me as an Online client you can find out more information here.
If You Want To Be In The Know About…
New exercises to try, recipes to make that are both healthy & delicious, or relevant workout programs, meal plans, or popular blog posts? Put your email below and i’ll add you to my inner circle email list (no more than 1 email per month, often less).

