
Everyone Should Squat Regularly and Here’s Why
Post published: Jan 19, 2019
Post updated: Feb 8, 2020
There are six big movements I think everyone should do regularly, and Squats are one of them.
Why? Many reasons, but I’ll highlight a few (ok, maybe more than a few):
- Full Body Exercise. The Squat is a full body exercise: your legs are the driving force moving the weight while you descend and ascend, your abs and lower back muscles stabilize your trunk throughout the movement, and your upper-back, shoulders and arms balance the bar on your back.
- Weight Loss. If you’re looking to lose weight, the squat is very energy intensive exercise. It uses large muscle groups and therefore you get the most “bang for your buck” in terms of doing an exercise that burns the most calories.
- Build Muscle. Since you are using many muscles simultaneously, it’s a great exercise to work many muscle groups with one exercise; further heavy lifting can help boost testosterone. Confused between this point, and the previous one? Read this for more info, but essentially this is a great exercise to help you gain weight, provided you eat in a caloric surplus.
- Have More Energy. This is a common movement used in daily living, and increasing your strength with squats will make daily tasks easier and you won’t get fatigued as easily, eg. something like taking the stairs, or running around with your kids won’t exhaust you as quickly.
- Maintain Muscle. If you “don’t use it, you’ll lose it.” Therefore maintaining your strength, and muscle, is important. This is especially important with the aging population when it comes to independence, eg. being able to get out of a chair.
- Strengthen Bones. Another selling point for the aging population. Your bone density peaks around your 30’s, and constantly declines thereafter – unfortunately. But, having friction against them (muscle movements and contractions) can lessen the decline severity. This is especially important in post-menopausal women that are at risk for osteoporosis.
- Strengthen Joints. The stronger the muscles are around a joint the more they “pull” the joint together. In the case of the squat, your knees and hips “pull together” and become stronger – less prone to injuries in the future.
- Increased Athletic Ability. In sports, the squat is a very common movement. Therefore, increasing your strength of your squat can make you a better athlete. More specifically, it will make you more explosive (faster), stronger, more stable, and have more endurance. In regards to endurance, if you are stronger it requires less energy to propel your body forward with the same given weight. In reference to a runner, running a set distance with stronger legs would take less energy because each step takes less energy.
- Injury Prevention. As touched on earlier, with stronger joints you’re less likely to get injured – you’re less likely to roll your ankle, or knee. This has applications In both daily living and in sport. Something not mentioned in the strengthened joints point, is increased coordination and balance. Your brain-to-muscle connection is better and your general movement and spacial awareness is better. All of this aids in injury prevention.
- Increase Flexibility. Movement through a large range-of-motion is one of the better things for flexibility – better than static stretching. Doing squats helps with flexibility in your hips, legs, and upper back – provided you do the squat properly.
“But isn’t squatting bad for your knees?”
No it’s not, provided you do it properly. Also, there are variations that you can do to take the stress off your knee, but read this is you don’t believe me.
There are a few different variations of the Squat, the more common variations include:
- Dumbbell Squat
- Dumbbell Split Squat
- Barbell Back Squat
- Barbell Front Squat
- Overhead Squat
For the remainder of this post I’m going to talk about the Barbell Back Squat; a lot of the technique is similar for the other variations but there are some subtle, and some not-so-subtle, differences that I won’t talk about in this post.
The technique for the barbell back squat can be fairly technical, just like the deadlift. But, proper technique will ensure that you’re getting the most out of this exercise, and it will help you avoid knee and back pain.
First thing to know:
Everyone’s squat will, and should, look a little different
Your squat will look a little different due to your own individual anatomy: your femur head and hip socket anatomy, and how your torso and femur length relationship.
I won’t get into the details about all the differences you can have with your femur head and hip socket, read this if you want to know more, but what you need to know: your foot width and toe direction placement will be different based on your femur head and hip socket anatomy.
When it comes to femur and torso length, this will determine your torso position as you descend into the squat: If you have a long femur and short torso, you’re going to need to lean your torso more forward; If you have a long torso and smaller thigh, your torso will be more upright as you squat.
And, as mentioned earlier squatting isn’t bad for your knees, there are variations you can do that are knee friendly.
Initial Setup
Get under the bar, with the rack setting just below your shoulder height (you should be able to simply stand up and step back and get clearance). Unrack it by simply standing up and straightening your legs, then take a step back.
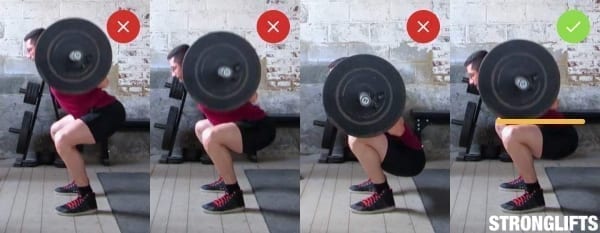
- Feet Placement: There are a few different variations you can have, and you’re going to have to play around to see what allows you to: 1. squat to good depth (where your hips are below your knees, see picture below in the descent section for a reference), while: 2. allowing you to keep your heels on the ground, 3: allows you to feel the leg muscles evenly (you’re not symmetrical), and 4. being able to keep a neutral lumbar spine (lower back) throughout the movement. Start by trying heels under your shoulders, toes straight. Then try heels under your shoulder and toes pointed 30 degrees out. Repeat with feet outside shoulder width, with both toes straight and toes 30 degrees outwards. Find the setup that feels the most comfortable and feels like there is no restriction in your hips; this is a good video that describes this well. Personally I have to have a slightly wider than shoulder width stance, which is common for taller people, and have my toes pointed outwards; with straight toes and shoulder width foot placement I get hip impingement and can’t go lower.
- Here are some great resources to explain the above more thoroughly: toe placement, infographic on femoral anteversion & retroversion, and hip anatomy and squat mechanics, different types of stance and toe positions
- Bar Position: The two different bar positions are high or low, high being placed on your traps and low being placed just above your shoulder blades; with both variations, position yourself in the middle of the bar. You want to keep your upper back tight and squeeze your shoulder blades together to create a “shelf” for the bar to rest on; if you do this properly, you shouldn’t need a bar pad or towel. There are a few opinions on what the best bar position is, but my stance is this: do what feels good for you and allows you to do a technically great squat. And be open to trying both, and changing it as needed. If you don’t have very muscular traps, the low bar position is usually the most comfortable – you don’t want the bar putting pressure on your vertebrae. Also, if you’re tall the low bar position tends to work better too because it will allow you to get your center of mass back further. Lastly, grip the bar close or wide, whatever feels best for you – whatever doesn’t piss your shoulder off and whatever allows you to keep your wrists neutral and ensures that your elbows don’t flare outward.
The Descent
- Brace your Core: when doing a movement that requires core stability, you want to take a diaphragmatic breath: “pretend like you are trying to push out a poop” which causes intra-abdominal-pressure (IAP) to stabilize your trunk and the overhead weight in a squat. A great analogy I use with my clients to help them understand is the comparison to a water bottle with, and without water. Without water, you can easily compress the bottle. With water, you can’t compress the bottle.
- Squat down: lower yourself by bending your hips and knees at the same time, while pushing your knees to the side and moving your hips back.
- “Triangle foot”: you want the weight equally distributed between three points on your foot: your heel, your big toe, and pinky toe. You can think of this as a triangle, where you want your heels down and are pushing into the floor, and pressure through your big and pinky toe. By putting pressure through these three points (think of it as “gripping” the floor) you’ll create a good arch to squat through which will prevent internal rotation of your ankle joint.
- Knees out: your knees need to track in the same direction as your toes, for most this means you need to drive your knees outwards as you squat. Some cues I give to my clients are: squish an imaginary cigarette butt with your heel; screw your feet into the ground. Both cues force you to contract your glutes to externally rotate your knee.
- Keep lumbar spine neutral: make sure your back doesn’t round. If it does, your stance is likely incorrect or you aren’t pushing your hips back far enough.
- Hit proper depth: break parallel, where your hips get lower than your knees (see picture below). If you don’t go low enough, your hamstring and glutes aren’t being worked effectively.
The Ascent
- Drive Upwards: drive upwards by pushing through your “triangle foot”, keeping your knees out, and straightening your legs and driving your hips forwards until you’re standing up straight.
- Breath out: release your IAP halfway up your ascent.
- Reset, repeat: reset the above, and repeat for the program requied amount of reps.
A few more relevant points:
- IAP isn’t as necessary when you are going 6+ reps, but it’s still good practice.
- Head position: keep your head neutral and in line with your torso, don’t look at the ceiling or in the mirror (if it’s in front of you). Also, definitely don’t turn your head sideways.
- Thoracic extension: if you have poor T-spine mobility (the position from your chest upwards), which is usually identifiable with upper back rounding posture, then you need to “pull down” on the bar and “reef your chest” upwards (extension) to help put the bar further back in your stance. This is common problem for people who are taller and who have long femur lengths
- Bar path and physics: you want the bar to move in a vertical line and in one plane, this should be over your mid-foot. You don’t want horizontal movement, and your goal with the squat is to have the center-of-mass balanced between your feet throughout the full movement. Easier said than done, but that’s the goal and this will allow you to perform the squat the most effectively – and with the most weight.
- Elbows underneath you: for some people, especially if you are someone that has problems keeping the weight in your heels on the ascent, ensure your elbows are tucked underneath you and not flared pointing behind you.
If you’re looking to lift heavy on a particular day, or just want a good warm up, try this out:
I’ve linked quite a few other resources so far, but here are a few more for any of you that want some extra reading:
Also, If you’re looking for some good workout programs that will allow you to work on your squat focus, I’d recommend one of the following: 1. 5/3/1, The Wendler; 2. Stronglifts 5×5.
I hope all of the above helps you how to understand: 1. Why you should be squatting, and 2. How to properly squat.
Till next time,
-Mike
 Author Bio: Michael Fouts
Mike blogs on this website – michaelfouts.com – obviously, but also owns a Mobile and Online Personal Training Company called OverHaul Fitness. Mike loves helping people manipulate their body composition; losing weight while retaining muscle, or putting muscle on while minimize fat gain. Mike’s spare time is spent being active (hockey, squash, triathlons), eating sandwiches or beef jerky, or watching thought provoking movies or tv series (like Westworld). Connect with Mike via email: Mike@overhaulfitness.ca, or Social Media – links below:
If you’d like to work with me as an Online client you can find out more information here.
If You Want To Be In The Know About…
New exercises to try, recipes to make that are both healthy & delicious, or relevant workout programs, meal plans, or popular blog posts? Put your email below and i’ll add you to my inner circle email list (no more than 1 email per month, often less).

